Porcelain Tile Installation with Invisible Mechanical Fixing Systems (With Grooves)
For discerning architects, developers, and homeowners in the UAE seeking the ultimate in façade aesthetics and structural integrity, the Invisible Mechanical Fixing System with grooves offers an unparalleled solution for porcelain tile installation. This cutting-edge method meets the growing demand for durable, visually seamless, and high-performance cladding solutions for commercial, outdoor, high-traffic, or residential spaces. Aximer, as the UAE’s leading supplier of premium porcelain tiles and slabs, possesses the in-depth knowledge and superior products to guide you through achieving flawless and lasting installations with this advanced technique.
Understanding the Invisible Mechanical Fixing System with Grooves
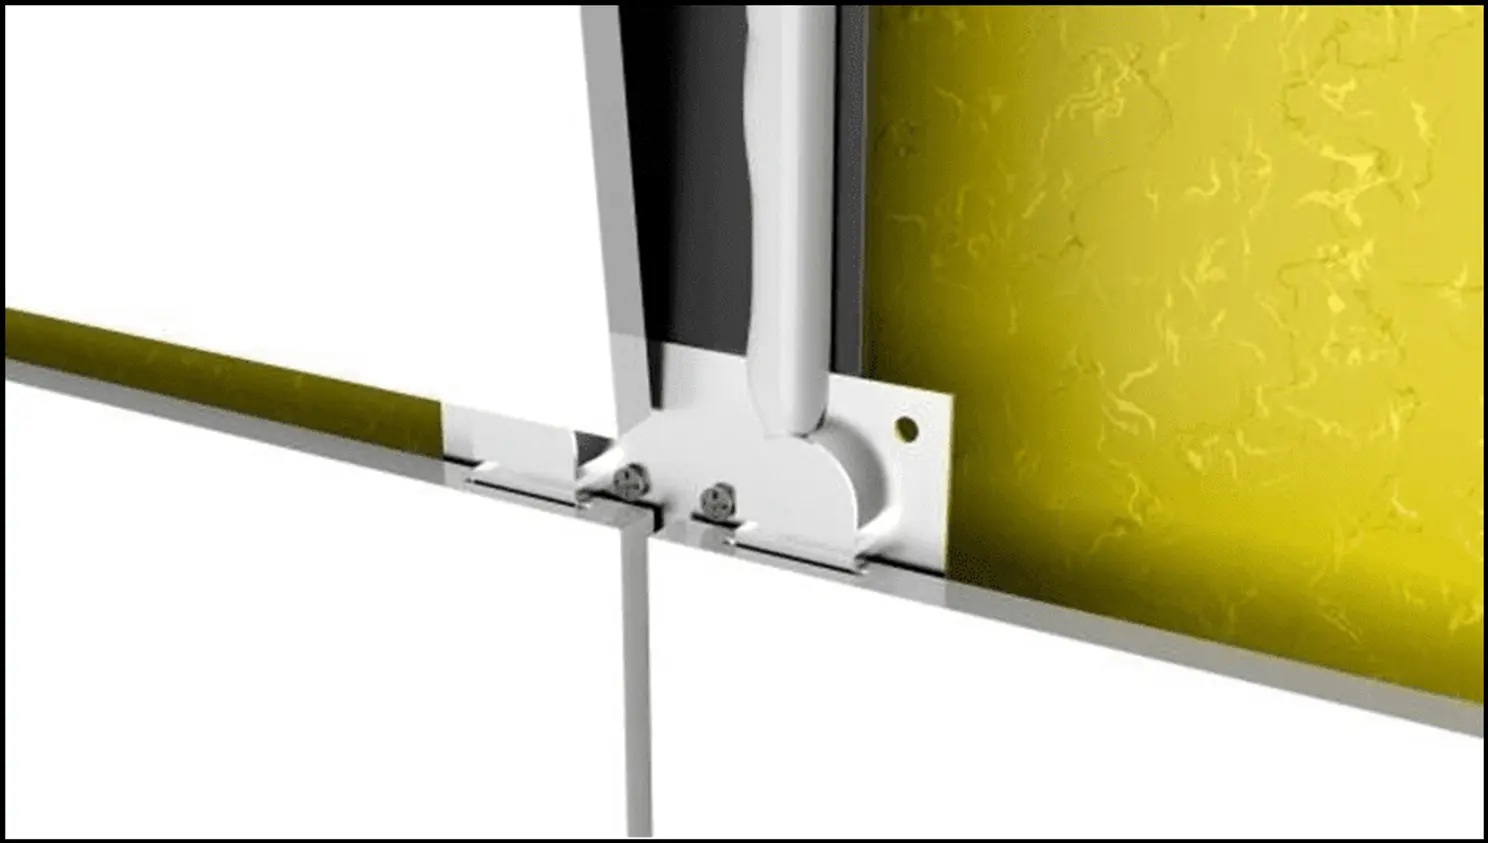
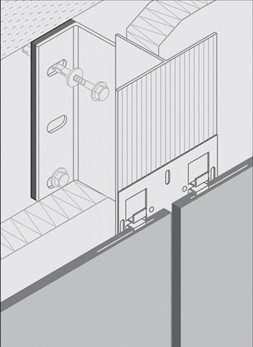
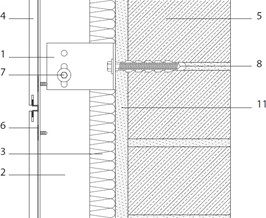
The Invisible mechanical fixing system is a sophisticated method designed to secure cladding materials, such as porcelain tiles and slabs, to a building’s façade without visible fasteners. This creates a clean, uninterrupted surface that enhances architectural beauty. When implemented with grooves, this system involves precise channels cut into the edges of the porcelain tiles. Stainless steel concealed fixing clips are then inserted into these grooves, interlocking with an underlying aluminum substructure. This method provides superior holding power and allows for thermal expansion and contraction, crucial for the longevity of façades, especially in the demanding UAE climate.
Compared to other mechanical fixing methods:
Groove System (Concealed/Secret Fix):
As detailed, it uses grooves cut into the tile edges and hidden clips. Offers a completely seamless aesthetic and robust hold.
Keil System:
Utilizes conical holes drilled into the back of the tile, into which special anchors (Keil bolts) are inserted. These anchors then attach to the substructure. Provides excellent pull-out resistance but requires specialized drilling.
Clip System (Visible/Semi-Visible):
Involves clips that are visible or partially visible on the tile surface or edges. While offering good security, they don’t achieve the seamless look of the groove or Keil systems.
The groove system is often favored for its exceptional aesthetic appeal combined with high security, making it ideal for prestigious projects.
Applications of Invisible Mechanical Fixing with Aximer Porcelain Stoneware
The Invisible mechanical fixing system with grooves opens up a world of possibilities for porcelain ceramic tile applications, transforming various spaces into masterpieces of design and durability. Aximer’s premium porcelain stoneware products are the perfect choice for these advanced installations, offering features ideal for high-traffic areas, demanding climates, and aesthetic ambitions:
Façades and High-Traffic Exteriors:
Our large-format porcelain slabs, available in sizes up to 160×320 cm, are engineered to withstand the UAE’s intense heat and occasional frost. Their inherent heat and frost resistance, combined with incredible durability, make them perfect for creating stunning, long-lasting ventilated façades for both residential and commercial buildings. Imagine the seamless elegance of a “Marble Look” or “Cement Look” slab gracing the exterior of a luxury villa or a corporate tower.
Wet Environments:
Porcelain’s extremely low porosity makes it ideal for areas with high moisture. Whether it’s the interior walls of a spa, the surrounding surfaces of swimming pools, or luxurious bathrooms, our scratch-resistant and water-impervious porcelain tiles ensure lasting beauty and hygiene.
Interiors and Public Spaces:
For bustling hotel lobbies, corporate offices, or elegant residential living areas, the durability and ease of maintenance of Aximer’s porcelain stoneware are unmatched. Products boasting “Wood Look,” “Stone Look,” or “Monocolor” effects, in various surfaces like polished or matte, provide endless design versatility while ensuring longevity against daily wear and tear.
Aximer’s porcelain stoneware solutions are designed to endure the demanding UAE climate and offer superior performance in both public and private settings, ensuring your architectural vision is realized with unmatched quality.
Aximer: Supplying Top Porcelain Tile Brands for the UAE Market
At Aximer, we believe in providing our customers with nothing but the best. That’s why we partner with the world’s most renowned porcelain tile manufacturers to bring their exceptional products directly to the UAE. Our curated selection includes prestigious Italian ceramic giants such as Saime Ceramiche, Ceramiche Supergres, and Famarella, known for their innovation, quality, and diverse design ranges. This commitment to sourcing from top-tier brands ensures that whether you’re seeking materials for a large-scale commercial venture or a bespoke residential project, Aximer provides porcelain tiles and slabs that meet the highest standards of aesthetics and performance.
Explore Aximer’s Collections: Visit Our Dubai Showroom or Browse Online
Ready to witness the vast potential of premium porcelain tiles and slabs? Visit the Aximer tile shop showroom in Dubai, UAE, where our expert staff is eager to guide you through our extensive collections. Experience the tactile quality, visual impact, and diverse applications of our porcelain stoneware firsthand. If a visit isn’t convenient, our user-friendly website at https://aximer.ae/ allows you to explore our comprehensive range of porcelain products online. Utilize our advanced filters to find the perfect solution by size, effect (including Wood, Marble, Travertine, Cement, Metal, Stone, Monocolor, and Decor), surface (Polished, Matte, Relief, Glazed Polished, Natural Evo-Dry, Semi Polished, Soft Matte, Natural), and a rich palette of colors (Black, Brown, Gold, Orange, Red, Pink, Blue, Cream, Grey, Green, White) for your walls, floors, or any other tiling needs.
Partner with Aximer: Expert Guidance for Your Fixing System Needs
Navigating the intricacies of the Invisible mechanical fixing system with grooves requires specialized knowledge and precision. At Aximer, we’re not just suppliers; we are your partners in achieving flawless installations. If you have questions about the suitability of this system for your project, need detailed technical assistance for porcelain tile or slab flooring, or wall cladding installations, or simply want to understand how to apply it perfectly, our team of experts in the UAE is ready to assist you. We offer comprehensive support to ensure your project’s success. Contact Aximer today – let us help you bring your vision to life with confidence and expertise.
Frequently Asked Questions About Invisible Mechanical Fixing Systems:
What is an Invisible mechanical fixing system?
An Invisible mechanical fixing system is an advanced method for installing cladding materials, particularly porcelain tiles and slabs, where the fastening elements are entirely concealed. This results in a clean, uninterrupted surface without visible screws or clips, enhancing the aesthetic appeal of the façade or wall. It relies on a substructure and specialized hidden attachments that connect to the tiles.
What are the differences between the Invisible mechanical fixing system with grooves, the clip system, and the keil system?
All three are mechanical fixing methods, but they differ in how they secure the tiles:
- Invisible Mechanical Fixing System with Grooves: This method involves cutting precise grooves into the edges of the porcelain tiles. Hidden stainless steel clips are then inserted into these grooves and attached to the substructure, providing a completely seamless finish.
- Clip System: This system uses clips that are either visible or partially visible on the surface or edges of the tiles to secure them to the substructure. While effective, it doesn’t offer the completely concealed look.
- Keil System: This system utilizes specialized anchors (Keil bolts) that are drilled into the back of the tile, creating a secure attachment to the substructure. It’s known for very high pull-out resistance but requires specific drilling techniques. The groove system is often preferred for its aesthetic benefits and ease of installation compared to the Keil system, especially with certain tile types.